How to make a homemade tablet pen? 3 alternatives
On our website, we always choose to answer your technical questions with the best and most accurate information available. That is why today we are going to respond to the concern of many users who are wondering how to make a homemade tablet pen.
Content of the page
Although not all styluses are as expensive as the Apple Pencil, ideal in combination with an iPad, the truth is that it is always a good idea to know how to make a homemade alternative: not only do you save money, but you also recycle.
How will our homemade touch pen work?
In order to successfully make a pen that works on all touch screens, you must first understand how touch screens work and how they interact with digital pens.
A touch screen, like the one on our smartphones and tablets, is made of materials that respond to electricity from our fingers: the screen technology is called capacitive, and the principle behind its operation is conductivity.
Therefore, when using another object instead of a finger to touch the screen, if the finger is not a good conductor of electricity, the screen simply does not work. Hence, we must use materials that can act as a bridge between the screen and our fingers.
How to make a touch pen for drawing?
Next, we show you 3 pencils with different things that you can find in your own home. We are going to show you the steps, and then you will only have to get down to work:
Alternative #1: Aluminum Cotton Touch Screen Stylus
As you may already know, aluminum is a decent conductor of electricity, and aluminum foil is very readily available. So here’s how to make a tin foil stylus using a plastic pen and cotton swab:
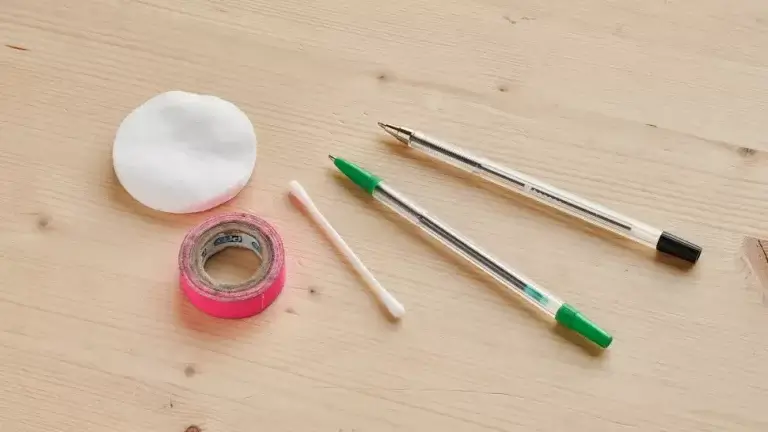
Materials:
- Earpick or cotton swab
- aluminum foil
- Scotch tape
- Plastic pen (it can be metallic or aluminum, and thus you save the aluminum foil and the adhesive tape)
- Pair of scissors
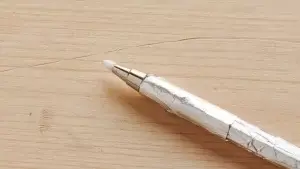
1. Take apart the pen
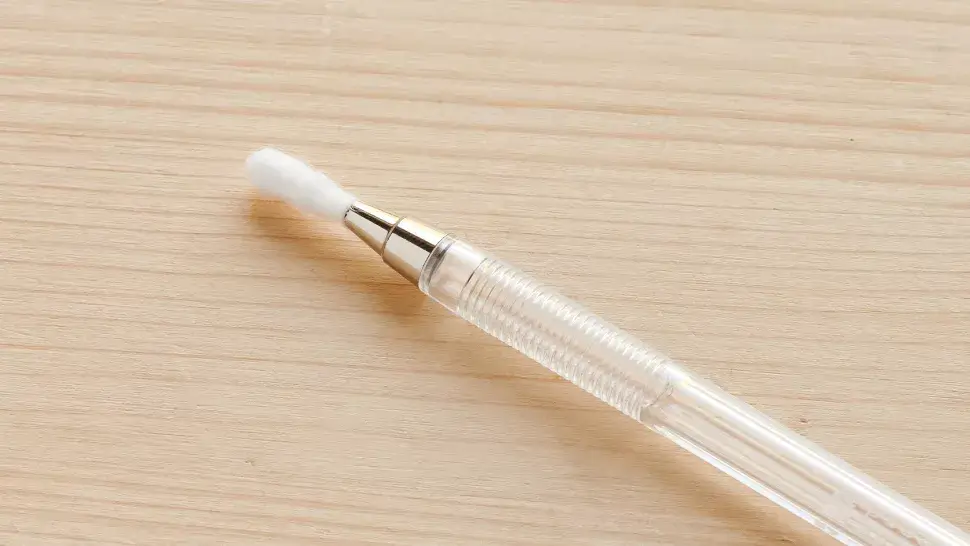
As you can see in the image, we have disassembled our pen, leaving only the body and adding a cotton swab, which will be the new tip. In practice, we’ve found it best to add the pen refill afterward, cutting off a bit to help hold the swab tip in place.
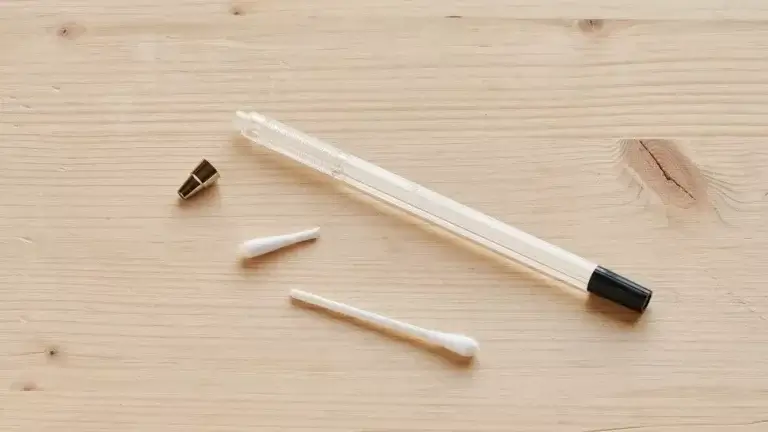
2. Cut and insert the cotton swab
Cut off one end of the cotton swab or earpick, leaving a small piece of plastic sticking out to fit against the pen refill. This must be made of compressed cotton so that it conducts electricity better, and preferably have a plastic or wood center almost to the tip so that it remains firm when pressed against the screen.
We will insert the plastic part that sticks out through the hole of the pen, and then we will put it back together. If your pen is plastic, it’s time to cover the body of the pan with aluminum foil, make sure that this foil touches the cotton, but not completely cover it.
Then secure with adhesive tape, which can be aluminum for better conductivity, or it can be plastic, only with this you should not completely cover the aluminum.
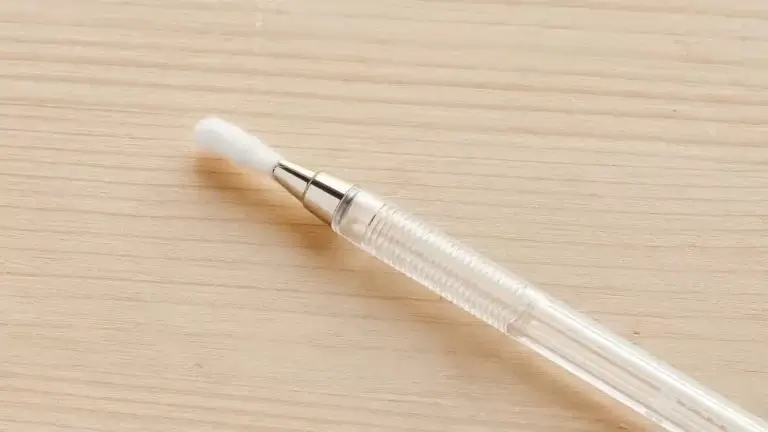
3. Wet the tip and test
The only thing left to do is moisten, and BEWARE! just moisten the cotton without soaking it, you don’t want to ruin the screen either. Finally, you can try it on your tablet.
Alternative #2: Homemade fine tip stylus
If what you are looking for is a fine tip pencil, more similar to a professional stylus that allows you greater precision when touching, here is the solution. Before we start, we want to warn you that the fact that your pencil has the thinnest point, will not make your strokes thinner or thicker, as this depends on the app you are using and how you adjust the thickness of the virtual brush.
However, a thinner tip will allow you to have a better view of what you are doing on the touch screen, and work in more detail if you are drawing.
Materials:
- fine tip marker
- Aluminum foil (approximately 20×20 cm)
- aluminum adhesive tape
1. Drain the ink from the marker
The first thing you will do is look for a marker with a very fine tip, and preferably one that has not been worn: remember that the tip of the markers is made of a semi-hard material, which tends to deform with use.
To avoid painting the screen, we will place the marker in a container with water and let it rest for a couple of hours, changing the water every so often so that all the ink drains.
2. Wrap the body with aluminum foil
Once the marker is free of ink, use small tweezers to push the tip of the marker out a bit more, but not all the way! It is just to have a larger surface to which the aluminum foil with which we will cover the body of the marker can adhere.
When wrapping it, we must allow the aluminum foil to make contact with the tip material, but without covering it completely.
3. Secure the paper with tape
To keep the aluminum foil in place, you can secure it with a few pieces of regular duct tape, without completely covering the metal material.
4. Wet the tip and taste to your liking
The only thing left now is to moisten the tip and use it naturally.
Alternative #3: Stylus without foil (and without water)
Of course, not everyone has aluminum foil at home (although the aluminum that lines the inside of food bags like chips works just as well). Or you just don’t feel like getting your tablet or smartphone screen wet in order to save a few bucks on a simple stylus.
So this alternative is for you: Learn how to make a homemade Android stylus without aluminum, and that doesn’t need water to conduct electricity from your fingers.
Materials:
- Chinese chopstick or body of a plastic pen.
- conductive sponge
- Copper cable (30 centimeters)
- Scotch tape
- Pair of scissors
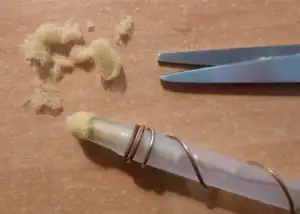
1. Cut the conductive sponge

The first thing you will do is locate a piece of conductive sponge, which is a very common material in electronic component packaging. At Techcombact as we are lovers of technology and we test all the products we recommend, we have a good number of conductive sponges.
But if you don’t have it at home, you can order it at an electronics store, as they get rid of a lot of packaging frequently.
Once you have the material, check first that it is conductive, by using it on the screen without being wet. If it does work, cut out a square piece big enough to cover the tip of your chopstick or the body of an unused pin.
2. Place and secure the sponge on the tip of the toothpick
Next, you will fix the sponge on the tip of the toothpick with one of the ends of the copper cable, which you can buy at a hardware store, or if you are a handyman, you will already have this material in your workshop.
The idea is that the sponge prevents the wood from scratching the screen and acts as a conductor, while the aluminum conducts electricity from your fingers to the screen.
3. Wrap the wire around the toothpick and cover with tape
It’s time to continue winding the copper wire along with the stick, and then make its touch more pleasant, using ordinary adhesive tape along the body of the pencil: Of course without covering the base with the sponge.
4. Screen test
With these simple steps, you will be able to get an adequate response from your touch screen. Of course, the conductive sponge wears out over time, like any material of this type, so you must be careful to change it when this happens and thus prevent the screen from ending up scratched.
Our acid test: homemade stylus vs. factory stylus
Of course, we could not say goodbye without telling you about the results we have obtained with our homemade alternatives and comparing them with the commercial ones.
In our three creations, we have achieved an adequate level of screen responsiveness. The results in navigation and displacement are adequate and fluid.
The click gesture from time to time does not work, especially in the options that use water, since the material begins to dry unevenly. In the sponge alternative, the response decreases considerably when we move our fingers away from the copper used to secure the sponge to the tip of the toothpick.
In the strokes, we have achieved the greatest precision with the stylus with a cotton swab tip and with the one made from the marker, since the tip is thinner and allows better manipulation of the body of the object. While the sponge stylus has been better for navigating and selecting icons without having to insist, since the contact surface with the screen is larger.
It must be accepted that none of these options is 100% accurate and depends on the quality of the materials used. In addition, even the simplest commercial pens combine precision with ergonomics and responsiveness, so if you decide to buy one, we invite you to consult our proposals for the best tablet pens in 2022.