How To Connect Hard Drive To Tablet?
In recent times, tablets have become worthy competitors to conventional laptops, and in order to increase their productivity and entertainment capacity, we found it very useful to show you the most efficient and safest way to connect a hard drive. or HDD to your tablet.
Content of the page
We say safe and efficient because, in reality, tablets are not fully prepared to take on the energy expenditure of external hard drives, which often have a capacity of more than 1 TB. Which is often the maximum that mid-range and high-end tablets can support via a microSD card.
Connecting them incorrectly may not only drain and damage the battery but could also end up causing the tablet’s software to crash, resulting in data loss or HDD damage.
That’s why don’t miss our tutorial so you can learn everything about the connection between a tablet and an external hard drive!
Connecting an external hard drive to an Android tablet
As you may have already noticed, there are not many tablets that incorporate a standard USB port, but rather have a micro USB or USB type C, to which the data or charger cable is connected.
Now, it is possible to use that micro USB input to connect an HDD or a pen drive, with the following accessories and steps:
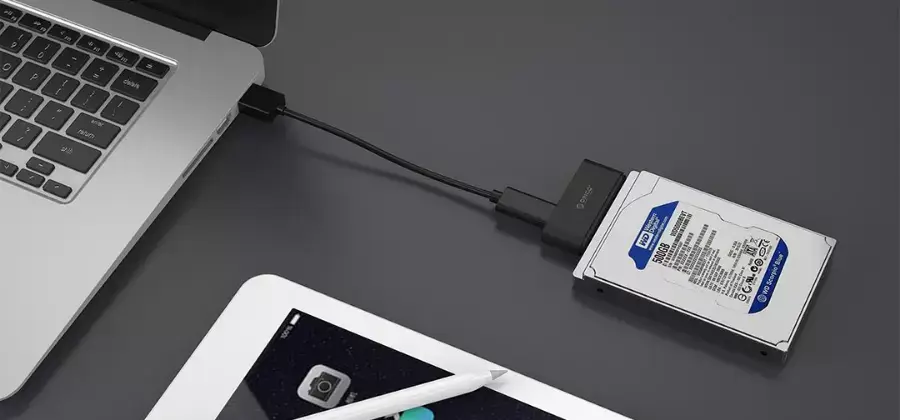
1. Use a USB On-The-Go adapter
The first thing you should have is an OTG adapter cable or simply a USB OTG cable, which at one end will have the male micro USB / USB-C male cable to which the tablet can be connected, and at the other end it will have the female USB port, the same USB 2.0 or USB 3.0 type: the difference between both generations lies in the speed of data transfer, with USB 3.0 being the fastest.
If your tablet is from a recognized brand, such as Samsung, Lenovo, or Huawei, we recommend you purchase an adapter from the brand or be compatible with it. Here are some links to the corresponding adapters:
In addition to the OTG cable, you may be interested in purchasing a USB Hub, which is nothing more than a conglomeration of several USB ports that you can connect both to your OTG adapter and to a power outlet (to avoid overloading the battery of the device to which it is connected). ).
And to which you can connect not only your HDD but also a keyboard, mouse, mobile phones, game controller, USB memory, and everything you can think of, to maximize productivity. But hey, let’s continue with the basic option of the OTG cable.
2. Get a “Y” cable for your hard drive
Once you have the OTG cable, it is highly recommended to buy a Y-type USB cable for your hard drive: this allows you to connect it to a standard USB port, and also incorporates another USB connector to connect to an external power source, such as a charger, avoiding draining the battery of your tablet.

Due to the fact that hard drives, due to their enormous storage capacity, need to receive energy to be able to reflect their data on the device to which they are connected, they can easily end the charge of a tablet, whose battery is not prepared to assume the consumption of these .
If necessary: Turn on “USB Debugging”
At this point, when you connect the OTG adapter to the tablet, and the hard drive to the adapter and power simultaneously, a notification about a new external storage drive connected should appear on your tablet screen.
Some tablets may display a message that requires you to format the drive for proper operation, but this is not necessary, so you can ignore the message… and keep your data safe by backing it up.
On certain occasions, when the tablet does not recognize the hard drive, it may be necessary to activate the USB Debugging function.
Settings/Developer Options/USB Debugging
Safely remove the USB so you don’t lose any data
Something you should never forget is that when you finish using your hard drive on the tablet, you should remove it safely even if it is not a laptop or computer to which you have connected it. The same also applies to pen drives.
To do this you must locate the notifications menu. From there you will continue as follows:
USB Connected Storage/Remove USB Mass Storage Safely
By always carrying out this simple step before disconnecting your drive, you will avoid failures and errors in both the operation of the tablet and the hard drive.
How to connect hard drive to Samsung Galaxy Tab tablet
Something that we have detected in our experience with Samsung tablets, and that happens to many users, is that they cannot get their device to recognize external hard drives, here are the possible causes and solutions:
For a Samsung tablet to recognize an external hard drive, it must be in FAT32 format and or in NTFS:
Hard drives are usually configured in this last format since it is the one that allows copying files with a weight greater than 4 GB. In case you want to change the format of your disk, you will need to format it.
But before going for such a radical solution, you can install the Paragon File System Link app, with which you will make your Samsung or Android tablet compatible with your NTFS hard drive.
Samsung devices often require the installation of an app that works as File Manager, in order to recognize and manage external USB devices.
My tablet does not recognize my hard drive, what to do?
Sometimes, some tablets fail to recognize the hard drive that is connected to them, and the truth is that it can be due to both physical failures and the inability of the hardware to support it.
You can always check the physical ports for garbage or breakage. But in any case, you should also examine the following possibilities:
1. Check your tablet drivers
On certain occasions, some Android tablet or phone requires a specific driver to recognize external hard drives. To find out for sure if this is the case, check with the brand’s technical support.
2. Download the Paragon File System Link app
The incompatibility of portable devices with the NTFS format is not exclusive to Samsung tablets or Android phones.
For this reason, we recommend that you purchase the Paragon application that we told you about above, through which you will be able to access your hard drive without having to change the format to FAT 32.
3. Install the USB OTG Checker app
In addition to checking if your hard drive is working properly by connecting it to a laptop, you can download the OTG Checker app to see if your tablet is compatible with this type of adapter.
Now yes, tell us if you have managed to make your tablet recognize your hard drive, or if you missed taking into account any of the accessories that we have recommended.