Changing RAM Speed in BIOS on Lenovo Laptops: The Real Answer (2026 Guide)
If you’ve come here looking for a step-by-step guide to changing the RAM speed in BIOS on your Lenovo laptop, you deserve an honest answer first: on most Lenovo laptops, you can’t. Lenovo locks DRAM frequency and voltage settings out of consumer BIOS firmware on the majority of its laptop lineup. The “Advanced” tabs and “Memory Settings” menus that other guides describe simply don’t exist on most Lenovo laptops.
Content of the page
This isn’t a limitation of your specific machine — it’s a deliberate choice by Lenovo, and it applies across IdeaPad, Yoga, ThinkBook, ThinkPad consumer line, and most Legion models. The exceptions exist (we’ll cover them), but they’re narrow.
The good news: there are several real things you can do to actually improve RAM performance on a Lenovo laptop. They’re different from “changing the speed in BIOS,” but they’re the things that actually move the needle. This guide covers both: what’s truly possible, and what to do instead of chasing a setting that doesn’t exist.
Quick summary by Lenovo line:
| Lenovo Line | RAM speed adjustable in BIOS? | Best you can do |
|---|---|---|
| IdeaPad (all models) | No | Run at rated XMP (auto), upgrade RAM if socketed |
| ThinkPad (consumer T/E/L/X series) | No | Same as IdeaPad |
| ThinkPad P-series mobile workstations | Limited (some models, ECC only) | Profile selection, not frequency |
| Yoga (all models) | No | Run rated speed, upgrade if non-soldered |
| ThinkBook | No | Same |
| Legion gaming laptops (5/7/Pro/Slim) | Sometimes (XMP profile toggle, no manual freq) | Enable XMP/EXPO if available |
| LOQ gaming laptops | Rarely | Check BIOS for “Memory Profile” |
| Lenovo Legion desktops & ThinkStation | Yes (full controls) | Manual frequency, voltage, timings |
If you have a desktop or workstation, this guide doesn’t fully apply — those have the freedom you’re looking for. If you have a laptop, keep reading.
Why Lenovo Locks RAM Settings on Laptops
Understanding why this is locked helps you accept that no firmware update or BIOS unlock will give you what you want.
Three real reasons:
- Thermal envelope. Laptops are designed to run within a tight thermal budget. The RAM in your IdeaPad has been validated by Lenovo at one specific frequency-voltage combination that the cooling system can sustain. Allowing users to push it higher would create a stream of warranty claims for thermal failures and instability. Lenovo would rather not give you the option.
- Validation cost. Each combination of RAM frequency/voltage/timings has to be tested for stability across thousands of usage scenarios. Lenovo validates one configuration per model. Opening it up to user adjustment means supporting failure modes Lenovo never tested.
- Component variance. Laptops often ship with a mix of RAM brands depending on supply chain availability. Two “identical” Lenovo IdeaPad 5 laptops might have RAM from different manufacturers with subtly different overclocking headroom. Locking everyone to the rated speed is the only way to guarantee the laptop works reliably regardless of which components were used at the factory.
This is also why third-party “modded BIOS” for Lenovo laptops carry serious risk. Some exist on niche forums, but they bypass Lenovo’s thermal protections and component validation. We don’t recommend them — the upside is small, the downside is a bricked laptop with no warranty support.
What’s Actually Possible on Lenovo Laptops
Here’s the honest breakdown of what you can and can’t adjust by Lenovo line.
IdeaPad, Yoga, ThinkBook, ThinkPad consumer (T/E/L/X series)
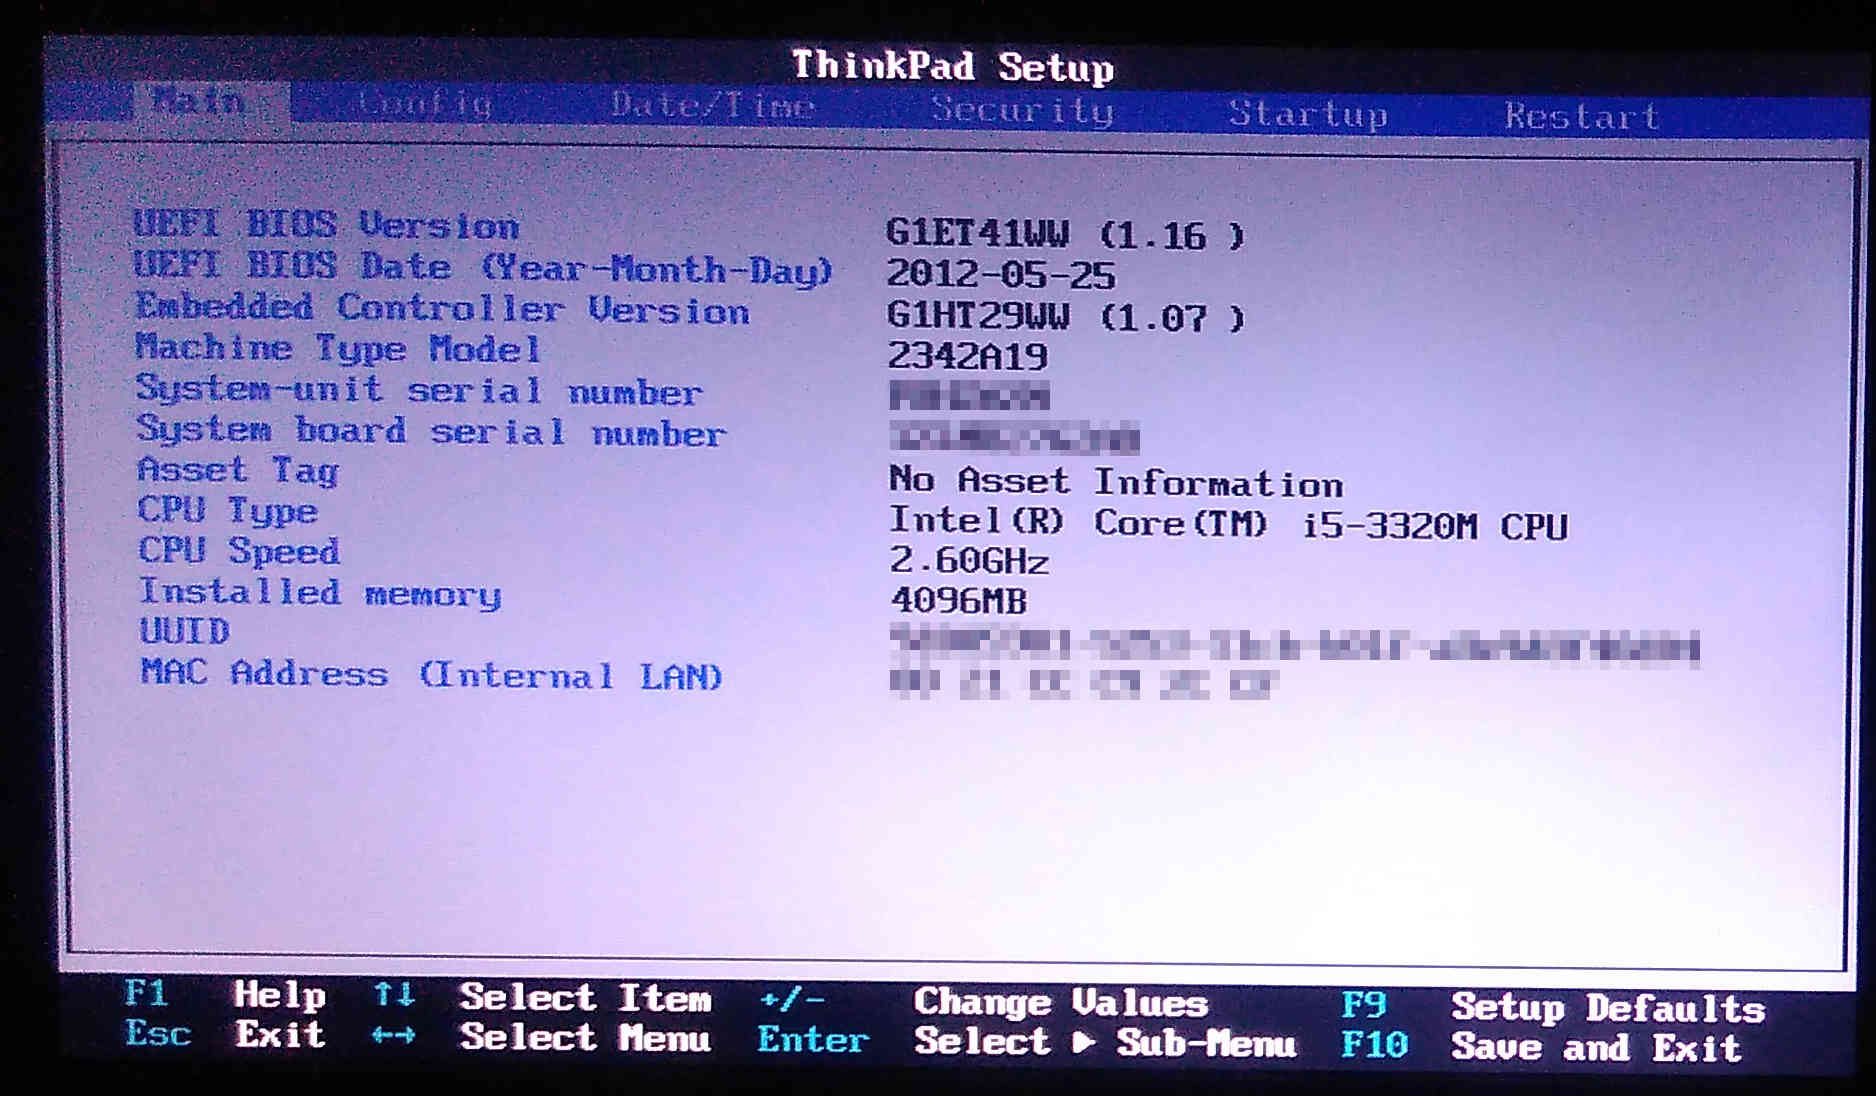
What’s in the BIOS: boot order, security settings, virtualization toggles, fan profiles in some newer models, secure boot. Not in the BIOS: any DRAM frequency, voltage, or timing controls. Period.
What you can do:
- Run RAM at its rated SPD speed (which it does automatically at boot)
- If the laptop has a socketed RAM slot (not soldered), upgrade to higher capacity to reduce memory pressure
- Use Lenovo Vantage or BIOS to switch power/fan profiles for sustained performance under load
If a guide tells you to look for “DRAM Frequency” or “Memory Voltage” in your IdeaPad BIOS, the guide is wrong (or describing a desktop). Your menus simply don’t include those entries.
ThinkPad P-series mobile workstations
What’s in the BIOS: memory profile selection between Optimized and Maximum Performance modes on some recent P-series models (P1, P15, P16, P17). This isn’t manual frequency control — it’s two preset profiles, and the difference between them is usually a 5–10% performance variation under sustained workloads.
What you can do:
- BIOS → Power → check for Memory Performance or DRAM Performance option
- If present, set to Maximum Performance for sustained workloads
- Be aware: this can increase fan noise and reduce battery life
Legion gaming laptops (5, 7, Pro, Slim — DDR5 era)
What’s in the BIOS: on some Legion models from 2023+, you’ll find an XMP or AMD EXPO toggle. This is the closest Lenovo gets to user-controlled RAM speed on a laptop, and it’s still not “set any frequency you want” — it’s “enable or disable the manufacturer’s predefined performance profile.”
What you can do:
- Restart laptop, press F2 during boot to enter BIOS
- Look under Advanced → Memory Configuration or Performance
- If you see XMP (Intel) or EXPO (AMD), toggle it On
- Save and reboot
- The RAM will now run at its highest validated profile (e.g., 5600 MHz instead of the default 4800 MHz on a recent Legion 5i)
If your Legion BIOS doesn’t show XMP/EXPO, your model doesn’t support it. Don’t try to “unlock” it — there’s no legitimate way to do this.
Older Legion (2018-2022) and Y-series
What’s in the BIOS: essentially nothing for RAM. Even gaming-branded models from this era inherited the consumer BIOS lockdown.
What you can do:
- Same as IdeaPad: rated SPD speed, RAM upgrade if socketed
LOQ gaming laptops (newer budget gaming line)
What’s in the BIOS: sometimes a Memory Profile toggle, behaves like XMP/EXPO. Check by entering BIOS at boot.
How to Check Whether Your Specific Lenovo Has RAM Options
The fastest way to know what you actually have is to look. Here’s how:
- Save your work and shut down completely (not sleep)
- Power on, and immediately press F2 repeatedly until BIOS Setup appears. On some Lenovo models you press Fn + F2, on a few older ones it’s F1 or the small button next to the power button (Novo Button) followed by selecting BIOS Setup
- Once in BIOS, look for these menu names: Advanced, Configuration, Performance, Memory, DRAM. On most consumer Lenovo, these either don’t exist or contain only boot/security settings
- Specifically look for these entries: DRAM Frequency, Memory Speed, XMP, EXPO, Memory Profile, Memory Performance
- If you find any of these, you have at least some control — usually XMP/EXPO toggle. If you find none, your laptop has the standard Lenovo consumer lockdown
There is no menu hidden behind a key combination, no developer mode, no Lenovo Vantage setting that unlocks BIOS RAM controls. Don’t trust YouTube videos that promise “secret BIOS unlock” for Lenovo laptops — at best they’re showing a workstation BIOS that’s not your model, at worst they’re trying to install modified firmware that bricks your laptop.
What to Do Instead: Real Ways to Improve RAM-Limited Performance
If your laptop feels slow because of RAM, the truly effective fixes are different from what you came here looking for. Here’s what actually works.
1. Confirm RAM is Actually the Bottleneck
Before doing anything else, verify the problem is RAM. Open Task Manager (Ctrl+Shift+Esc), go to the Performance tab, click Memory.
What you’re checking:
- Memory usage at peak: if you’re consistently at 80%+ usage and seeing “In use (Compressed)” climbing, RAM is your bottleneck
- If you’re at 40–60% RAM usage but the laptop feels slow, the bottleneck is elsewhere — probably storage (HDD instead of SSD), CPU thermal throttling, or background processes. RAM speed adjustment wouldn’t help even if it were possible
2. Verify RAM Is Running at Its Rated Speed
Sometimes Lenovo laptops boot RAM at a slower speed than rated — usually because of a mismatched second stick or a configuration quirk after a RAM upgrade. To check actual current speed:
- Download CPU-Z (free, from cpuid.com)
- Open it, go to the Memory tab
- Look at DRAM Frequency and double it — that’s your effective speed (DDR runs at 2x the displayed frequency)
For example, if CPU-Z shows DRAM Frequency 1600 MHz, your RAM is running at DDR4-3200, the rated speed. If it shows 1066 MHz when you’ve installed DDR4-3200 modules, the system is running them at DDR4-2133 — slower than rated.
If your RAM is running below its rated speed:
- Mismatched modules: if you added a stick of different brand/timing/speed, the system runs both at the lower spec. Solution: install matched pair or remove the slower one
- Below-spec compatibility: some Lenovo models cap supported RAM speed at a value lower than what the modules support. Check your model’s official specs at psref.lenovo.com — if your model supports max DDR4-2666 and you bought DDR4-3200, the system will run at 2666 regardless. This is normal, not a fault
3. Add More RAM (Capacity Beats Speed)
For 90% of “my laptop is slow” cases, adding RAM capacity helps far more than increasing RAM speed ever could. Going from 8GB to 16GB on a Lenovo laptop produces a dramatic improvement in browser-heavy and multitasking use. Going from DDR4-2666 to DDR4-3200 (if it were possible on your laptop) would produce a 3–5% improvement. The math is overwhelming in favor of capacity.
To check if your Lenovo has a socketed (upgradable) RAM slot:
- Lenovo Vantage → System → Hardware Settings → check RAM info
- Or consult your model’s HMM (Hardware Maintenance Manual) at lenovo.com/support
- Some recent ultrabooks (Yoga Slim, ThinkPad X1 Nano, modern IdeaPad ultraslim) have soldered RAM that cannot be upgraded — period. If yours is soldered, this option is closed
For socketed models, upgrade is typically a 15-minute job: remove back panel, insert SODIMM, reattach. Always use Lenovo’s specified RAM type and speed for your model. RAM running above your laptop’s max supported speed will downclock; RAM below will be stable but slower.
4. Free Up RAM Through Software
If you can’t add capacity, you can reduce demand:
- Disable startup apps you don’t need: Task Manager → Startup → Disable everything you don’t actively use
- Uninstall Lenovo bloatware: Vantage, Lenovo Now, McAfee trials, and similar consume RAM in the background. Use Lenovo’s own Lenovo Vantage → Hardware Settings → Manage Pre-installed Apps
- Use Edge or Firefox instead of Chrome: Chrome is the heaviest browser by RAM consumption. On a 8GB laptop, switching browsers can free 1–2GB during active use
- Reduce browser tabs: tabs sitting idle still consume RAM. Browser extensions like The Great Suspender (or Edge’s built-in Sleeping Tabs) suspend inactive tabs to free memory
5. Use SSD Performance to Mitigate RAM Bottlenecks
When RAM fills up, Windows pages data to disk. The speed of that disk dramatically affects how much you notice the slowdown.
- HDD-based Lenovo laptop? This is your real bottleneck, not RAM speed. Replacing HDD with SATA SSD produces 5x improvement in real-world responsiveness, vastly more than any RAM tweak
- NVMe SSD already? Then page-out to disk is fast and RAM bottleneck is less painful. You’re already in the best position software can deliver
6. Check for Thermal Throttling
If your laptop is dropping CPU and RAM speeds during use, the cause might be heat — not a setting. Use HWiNFO64 (free) to monitor temperatures during heavy load. If CPU temps hit 95–100°C and the laptop slows down, the throttling is thermal, not RAM-related.
Solutions:
- Clean the cooling vents (compressed air from outside, no opening required)
- Use the laptop on a hard flat surface, not a soft surface that blocks vents
- Reapply thermal paste (advanced — for laptops 3+ years old, this can recover 5–10°C)
- In Lenovo Vantage, switch from Battery Saver to Intelligent Cooling or Performance mode
7. Update BIOS to the Latest Version
While BIOS updates don’t unlock RAM controls on consumer Lenovo laptops, they sometimes include memory training improvements that resolve specific stability issues with newer DRAM modules. Check for updates:
- Lenovo Vantage → System Update → check available updates
- Or support.lenovo.com → enter your Service Tag → Drivers & Software → BIOS
After any BIOS update, the system performs memory training on the next 1–3 boots, which can take 30–60 seconds longer than usual. This is normal — don’t power off mid-process.
The Common Misconceptions This Article Replaces
Several pieces of advice float around online for “changing RAM speed in BIOS on Lenovo.” Most are wrong. Here are the worst offenders, and what’s actually true:
“Press F2, go to Advanced, find DRAM Frequency.” On consumer Lenovo, the Advanced tab either doesn’t exist or contains only secure boot, virtualization, and similar — no memory controls. This advice is copy-pasted from desktop motherboard tutorials.
“Update BIOS to unlock hidden options.” Lenovo BIOS updates never add user-accessible RAM controls to laptops. They sometimes change menu structure or fix bugs, but new memory adjustment menus don’t appear after an update.
“Use a modded/unlocked BIOS to access hidden settings.” There are unofficial modded BIOS files for some Lenovo laptops on niche forums. Using them voids warranty, can permanently brick your laptop with a single failed flash, and the supposedly unlocked settings are usually unstable because Lenovo never validated them. Don’t do this.
“Adjust RAM frequency in Windows using Intel XTU.” Intel XTU works on some Lenovo desktops with K-series CPUs. On laptops, it either doesn’t run or shows greyed-out options. The exception: a few Legion models with unlocked CPUs let you adjust some Intel XTU settings, but RAM frequency is never among them on laptops.
“Disable XMP to slow down RAM and improve stability.” On laptops without XMP toggle, there’s nothing to disable — your RAM is already running at the JEDEC default. On laptops with XMP, the rated XMP profile has been validated by both the RAM manufacturer and Lenovo as stable. There’s no instability to fix by disabling it.
Frequently Asked Questions
Why does my Lenovo laptop run RAM slower than the spec? Three possible reasons: (1) you have mismatched modules and the system is running both at the slower module’s speed, (2) your laptop’s chipset caps RAM speed below your modules’ rated speed (check official specs at psref.lenovo.com), (3) one module is in single-channel mode because the second slot is empty or has a different capacity stick. None of these are fixable in BIOS — they’re hardware-level configurations.
Can I overclock RAM on a Lenovo gaming laptop? Only by enabling XMP or EXPO if your specific Legion or LOQ model has the toggle. Beyond that, no — Lenovo doesn’t expose manual frequency, voltage, or timing controls on any laptop, gaming or otherwise.
Will Lenovo Vantage let me change RAM speed? No. Vantage exposes power profiles, fan modes, and battery settings, but not RAM frequency or voltage.
My Legion has the XMP option — should I always enable it? Yes, generally. XMP profiles are validated by both the RAM manufacturer and Lenovo. The performance gain is typically 10–20% in memory-bound workloads (gaming, compilation, large dataset work). The downside is slightly higher heat and very slightly worse battery life. For a desktop replacement laptop, leave XMP on.
Why do other guides say RAM speed is adjustable in Lenovo BIOS? Most of those guides were written either for Lenovo desktops (which do allow adjustment) or were generated by AI without verification on actual Lenovo laptops. They’re wrong, but they remain online and propagate. The forum threads at forums.lenovo.com and tomshardware.com are full of users discovering this firsthand.
Can I increase RAM speed by changing it in Windows? No. RAM speed is set at boot during memory training and cannot be modified once Windows has loaded. Software claiming to “boost RAM speed” from within Windows either does nothing, or is doing something else (cache management, page file tuning) and labeling it misleadingly.
My laptop has soldered RAM and 8GB is too little. What can I do? Honestly, not much beyond software optimization. Soldered RAM cannot be upgraded under any circumstances. Once you’ve maximized the software fixes (Fix 4 above), the only remaining option is replacing the laptop. Future Lenovo purchases — verify socketed RAM in the spec sheet before buying if upgradability matters to you.
Is it worth buying faster-rated RAM than my Lenovo supports? Generally no. If your model supports max DDR4-2666 and you install DDR4-3200, the system will run the modules at 2666 — you paid more for capability you can’t access. The exception: if the higher-speed modules also have tighter timings (lower CAS latency) at your supported speed, you might get a marginal improvement. But it’s rarely worth the price difference.
Last updated April 2026. This guide reflects Lenovo’s current consumer laptop BIOS architecture and is verified against publicly documented configurations. If your specific model behaves differently from what’s described, please leave a comment with your exact model number — we update guides based on real reader experience.
These hardware limitations often reflect broader choices Lenovo makes in how it designs and locks down its laptop lineup — decisions that affect not just performance tuning, but the overall ownership experience. If you’re wondering whether those trade-offs also impact long-term reliability, it’s worth reading about how durable Lenovo laptops actually are before committing to a model that may leave you with fewer options down the road.
While exploring your Lenovo laptop’s memory limitations, you might wonder whether the RAM inside it could ever serve a second life in a desktop build. The physical difference matters more than most people realize: laptop modules use a compact SODIMM form factor that doesn’t slot directly into standard desktop motherboards. If you’re curious about the technical and practical details, this guide on whether laptop RAM works in a desktop breaks down the compatibility differences clearly.